#define IOR_THRESHOLD 1.000000001

float Fresnel_Dielectric(vector i, normal n, float eta)
{
//see https://en.wikipedia.org/wiki/Fresnel_equations
    float c = fabs(dot(i, n));
    float g = eta * eta - 1 + c * c;
    float result = 1.0;

    if (g > 0) {
        g = sqrt(g);
        float a = (g - c) / (g + c);
        float b = (c * (g + c) - 1) / (c * (g + c) + 1);
        result = 0.5 * a * a * (1 + b * b);
    }

    return result;
}

shader glass(
    color diffuse_col = 1.8,
    float ior = 1.45,
    output closure color bsdf = 0)
{
    float real_ior = max(ior, IOR_THRESHOLD);
    float eta = backfacing()? 1.0 / real_ior : real_ior;
    float fr = Fresnel_Dielectric(I, N, eta);

    bsdf = diffuse_col * (fr * reflection(N) + (1.0 - fr) * refraction(N, eta));
}
Se afișează postările cu eticheta source code. Afișați toate postările
Se afișează postările cu eticheta source code. Afișați toate postările
miercuri, 4 octombrie 2017
Blender 3D - Open Shading Language tutorial - part 001 .
Using this tutorial about Open Shading Language, you can try a glass shader.
The source code show a simple use for Fresnel equations.
The backfacing() and raytype() are two functions that provide the shader some information about the
state of the renderer and the scene at the time of evaluation.
I used just backfacing(), because is a raw example of this Fresnel equations.
As you can see the I, N, eta inputs from Fresnel_Dielectric() is used to get a result variable fr.
The all result of this shader is bsdf like a equation.
See the next code:
miercuri, 27 septembrie 2017
Blender 3D - Open Shading Language tutorial.
Today, I will show you how to use the Open Shading Language with Blender 3D version 2.79.
Use the Scripting area from Screen layout and Cycles for rendering.
Select from Render tab and check the option:Open Shading Language.
Add your object to test this tool.
For example you can use the default Cube.
Add a material to this object.
The Scripting area from Screen layout come with editor text.
Use Templates - > Open Shading Language -> Empty Shader and add this OSL script:
This will come with a open dialog icon to add your OSL script.
Link result to Color from your material Diffuse BSDF. All this steps I tell you is on the next image: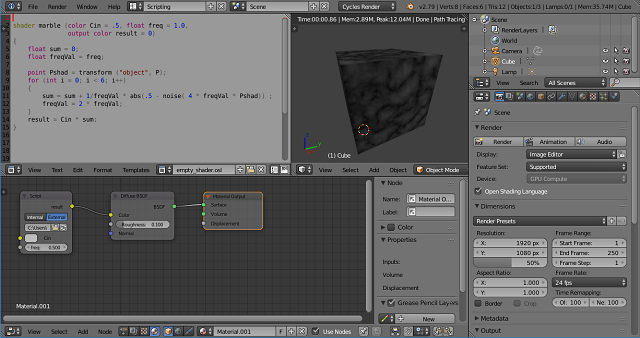
Use the Scripting area from Screen layout and Cycles for rendering.
Select from Render tab and check the option:Open Shading Language.
Add your object to test this tool.
For example you can use the default Cube.
Add a material to this object.
The Scripting area from Screen layout come with editor text.
Use Templates - > Open Shading Language -> Empty Shader and add this OSL script:
shader marble (color Col = .5, float freq = 1.0,
           output color result = 0)
{
float sum = 0;
float freq_value = freq;

point pixel_shader = transform ("object", P);
for (int i = 0; i < 6; i++)
{
    sum = sum + 1/freq_value * abs(.5 - noise( 4 * freq_value * pixel_shader)) ;
    freq_value = 2 * freq_value;
}
result = Col * sum;
} This will come with a open dialog icon to add your OSL script.
Link result to Color from your material Diffuse BSDF. All this steps I tell you is on the next image:
duminică, 30 iulie 2017
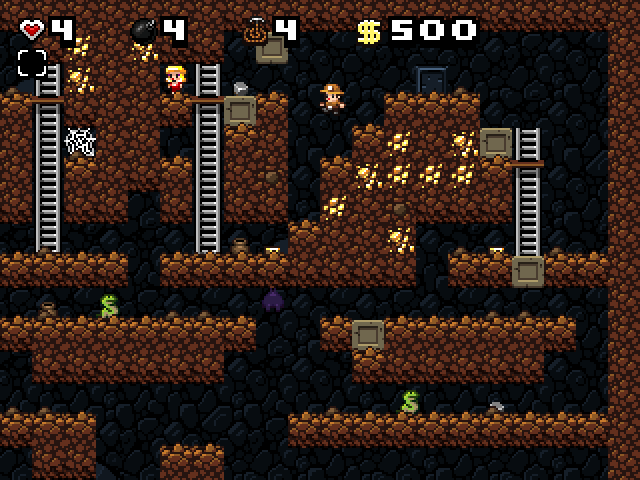
The Spelunky game .
If you liked old games like old Rick Dangerous, then here's another game named SPELUNKY.
The team development come with this intro:
"Legends speak of a Colossal Cave that extends deep underground, so twisted by time that its passages shift like the sand under which it lies... the Cave is said to be filled with fabulous treasures, but also incredible danger!"
The character of the game has a rope and whip that you can use to explore different areas of the game.
The keys Read about this game here.
marți, 20 septembrie 2016
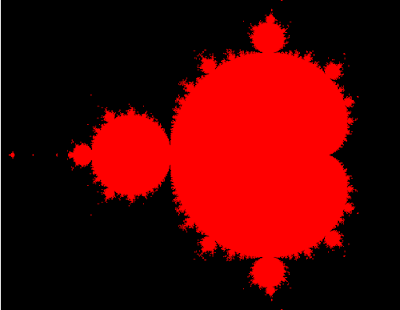
Mandelbrot with three.js .
The Mandelbrot set is the set of complex numbers c for which the function f c ( z ) = z 2 + c . - wikipedia.org
You need to download the three.js - java script from threejs webpage.
The source code is simple. Come with default HTML5 page and javascripts.
One part of this will make vertex-shader and fragment shader, both is 2D shader type.
You need the canvas tag with id="canv".
The last part of source code is make to put all into one image processing by shaders.
You can read this tutorial here.
 <!DOCTYPE html>
 <html>
 <head>
 <meta charset="UTF-8">
 <title>Title of the document</title>
 <script src="three.js"></script>
 </head>
 <body>

 <canvas id="canv" width="640" height="480"></canvas>

 <script id="2d-vertex-shader" type="x-shader/x-vertex">
 attribute vec2 a_position;
  void main() {
   gl_Position = vec4(a_position, 0, 1);
  }
 </script>

 <script id="2d-fragment-shader" type="x-shader/x-fragment">
  #ifdef GL_FRAGMENT_PRECISION_HIGH
   precision highp float;
  #else
   precision mediump float;
  #endif
  #define PI 3.14159

 float hash( float n ) { return fract(sin(n)*753.5453123); }

 #define NUM_STEPS  50
  #define ZOOM_FACTOR 2.0
  #define X_OFFSET  0.5

  #ifdef GL_FRAGMENT_PRECISION_HIGH
   precision highp float;
  #else
   precision mediump float;
  #endif
  precision mediump int;

  void main() {
   vec2 z;
   float x,y;
   int steps;
   float normalizedX = (gl_FragCoord.x - 320.0) / 640.0 * ZOOM_FACTOR *
             (640.0 / 480.0) - X_OFFSET;
   float normalizedY = (gl_FragCoord.y - 240.0) / 480.0 * ZOOM_FACTOR;

   z.x = normalizedX;
   z.y = normalizedY;

   for (int i=0;i<NUM_STEPS;i++) {

   steps = i;

     x = (z.x * z.x - z.y * z.y) + normalizedX;
     y = (z.y * z.x + z.x * z.y) + normalizedY;

     if((x * x + y * y) > 4.0) {
      break;
     }

     z.x = x;
     z.y = y;

   }

   if (steps == NUM_STEPS-1) {
    gl_FragColor = vec4(1.0, 0.0, 0.0, 1.0);
   } else {
    gl_FragColor = vec4(0.0, 0.0, 0.0, 1.0);
   }
  }
 </script>
 <script type="text/javascript">
 var gl;
 var canvas;
 var buffer;
  window.onload = init;

  function init() {


   canvas    = document.getElementById('canv');
   gl      = canvas.getContext('experimental-webgl');
   canvas.width = 640;
   canvas.height = 480;

   gl.viewport(0, 0, gl.drawingBufferWidth, gl.drawingBufferHeight);

 var shaderScript;
 var shaderSource;
 var vertexShader;
 var fragmentShader;

  buffer = gl.createBuffer();
  gl.bindBuffer(gl.ARRAY_BUFFER, buffer);
  gl.bufferData(
   gl.ARRAY_BUFFER,
   new Float32Array([
    -1.0, -1.0,
     1.0, -1.0,
    -1.0, 1.0,
    -1.0, 1.0,
     1.0, -1.0,
     1.0, 1.0]),
   gl.STATIC_DRAW
  );

   render();

  }

 function render() {

   window.requestAnimationFrame(render, canvas);

   gl.clearColor(1.0, 0.0, 0.0, 1.0);
   gl.clear(gl.COLOR_BUFFER_BIT);

  shaderScript = document.getElementById("2d-vertex-shader");
  shaderSource = shaderScript.text;
  vertexShader = gl.createShader(gl.VERTEX_SHADER);
  gl.shaderSource(vertexShader, shaderSource);
  gl.compileShader(vertexShader);

  shaderScript  = document.getElementById("2d-fragment-shader");
  shaderSource  = shaderScript.text;
  fragmentShader = gl.createShader(gl.FRAGMENT_SHADER);
  gl.shaderSource(fragmentShader, shaderSource);
  gl.compileShader(fragmentShader);

  program = gl.createProgram();
  gl.attachShader(program, vertexShader);
  gl.attachShader(program, fragmentShader);
  gl.linkProgram(program);
  gl.useProgram(program);
  positionLocation = gl.getAttribLocation(program, "a_position");
  gl.enableVertexAttribArray(positionLocation);
  gl.vertexAttribPointer(positionLocation, 2, gl.FLOAT, false, 0, 0);

  gl.drawArrays(gl.TRIANGLES, 0, 6);
  }
 </script>
 </body>
 </html>
miercuri, 28 noiembrie 2012
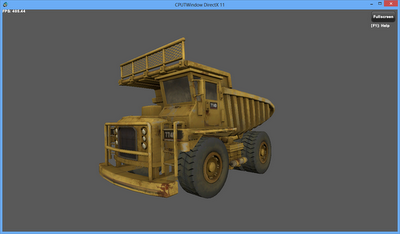
Source code from Windows 7 and 8: WM_GESTURE , WM_TOUCH , WM_POINTER
This a good news for the developers , Microsoft share source code to make available Touch feature in Windows desktop.
This sample demonstrates how to integrate touch into an application designed for a typical keyboard/mouse paradigm. Functionality has been added for many estures, showing how to map touch interactions to typical mouse interactions along with adding new gesture-only behavior such as two-finger rotate to rotate the truck and two-finger tap to reset it. The sample uses the Windows 7 WM_GESTURE API to provide the touch support and is supported on Windows 7 and Windows 8 with and without a touch screen.
You can get source code and demo to try it.
Abonați-vă la:
Postări (Atom)