Se afișează postările cu eticheta shadertoy. Afișați toate postările
Se afișează postările cu eticheta shadertoy. Afișați toate postările
joi, 27 noiembrie 2025
luni, 24 martie 2025
News : Shadertoy to Lens Studio Code Node 5.0 Conversion Guide - GitHub project.
I used shadertoy web tool and is good to understand a part of math ...
You can find a Shadertoy to Lens Studio Code Node 5.0 Conversion Guide from shadertoy to Lens Studio on this GitHub project.
sâmbătă, 18 ianuarie 2025
duminică, 1 decembrie 2024
Shadertoy: Warp of the West
... the shader of this years from 1 december 2024.
duminică, 10 noiembrie 2024
Shadertoy: Warp of the West
... see this shader at the official website.
marți, 23 ianuarie 2024
News : From Shadertoy to Godot 4: Learn to convert the shader code (tutorial) !
... this is not current news, but it is informative and, you can see more on youtube channel named FencerDevLog.
duminică, 20 noiembrie 2022
Shadertoy: matrix rotation for uv.
Today I wrote a simple example in shadertoy about how to apply a rotation using rotation matrices with sin and cos for a uv, see wikipedia.
For uv I used already defined uv. I created a stripe using the modulo function to make rotation visible and completed the rotation with the iTime variable defined in shadertoy to rotate it continuously.
Here is the created source code:
void mainImage( out vec4 fragColor, in vec2 fragCoord )
{
    //set the uv to a proper size on the center of screen
    vec2 uv = (fragCoord - 0.5 * iResolution.xy) / min(iResolution.x, iResolution.y);
    // set rotation angle value
    float rot = radians(0.0);
    // this set rotation by time and
    rot = iTime;a
    // algebra formula for rotation by matrix , https://en.wikipedia.org/wiki/Rotation_matrix
    mat2 m = mat2(cos(rot), -sin(rot), sin(rot), cos(rot));
    // rotation of uv with matrix algebra formula where is set the rotation angle
    uv = m* uv;
    // define float by function module from 1.0 and uv.x - uv.y
    float d = mod(uv.x - uv.y, 1.0);
    // color for fragColor is value of fload d by module function
    vec4 col = vec4(vec3(d), 1.0);
    fragColor = vec4(col);
}
Here is an example share from my shadertoy account.
duminică, 7 august 2022
Koch Fractal Magic from TheArtofCodeIsCool.
In the last video we made a fancy 3d fractal Christmas ball by using a Koch Snowflake curve. I mentioned there that there are multiple ways to use this curve to get 3d fractals. In this video we use another technique to get something completely different. If you like 3d fractals, this is a great video to watch.
This is another video from the last month comes from TheArtofCodeIsCool youtube channel.
duminică, 26 iunie 2022
luni, 6 iunie 2022
News : The Art of Code : How to turn your 2d fractal into 3d!
The The Art of Code come with a new video tutorial.
A while ago someone asked me if its possible to turn a 2d Koch Snowflake into 3d. I thought about it for a bit and came up with a few ways to do this. In this video we'll go over some of those ways!
luni, 11 aprilie 2022
Painting a Landscape using Mathematics by Inigo Quilez.
Inigo Quilez is a software engineer, technical artists, product manager and educator for 20 years, and have worked at places like Pixar and Oculus.
You can see the real-time rendering code on this webpage.
This is a video tutorial about how can build landscape using the mathematics:
miercuri, 22 septembrie 2021
Shadertoy: Use buffers - 001.
This tutorial is about how to use buffers with shadertoy webpage.
Create an account and use the New item from main menu to start a shader.
The default source code when you start the new shader is:
void mainImage( out vec4 fragColor, in vec2 fragCoord )
{
    // Normalized pixel coordinates (from 0 to 1)
    vec2 uv = fragCoord/iResolution.xy;

    // Time varying pixel color
    vec3 col = 0.5 + 0.5*cos(iTime+uv.xyx+vec3(0,2,4));

    // Output to screen
    fragColor = vec4(col,1.0);
}
The buffers, Buffer A, Buffer B, Buffer C, and Buffer D, let you create "multi-pass" shaders.
You can run different shaders in each buffer and you can be passed to another buffer with fragColor.
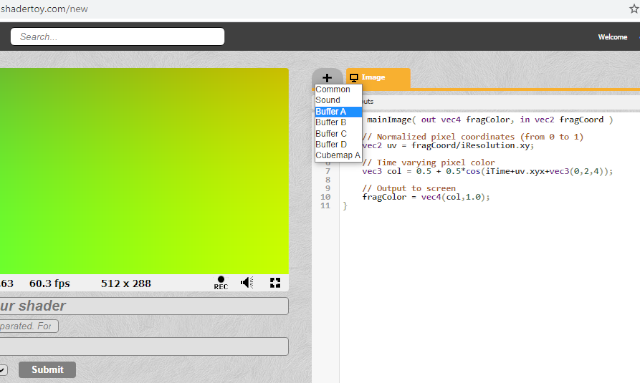
Press the + tab to add a new buffer into the new shader.
See the next image.
The BufferA comes with this source code:
void mainImage( out vec4 fragColor, in vec2 fragCoord )
{
    fragColor = vec4(0.0,0.0,1.0,1.0);
}
The next step is about the link between BufferA and main shader program.
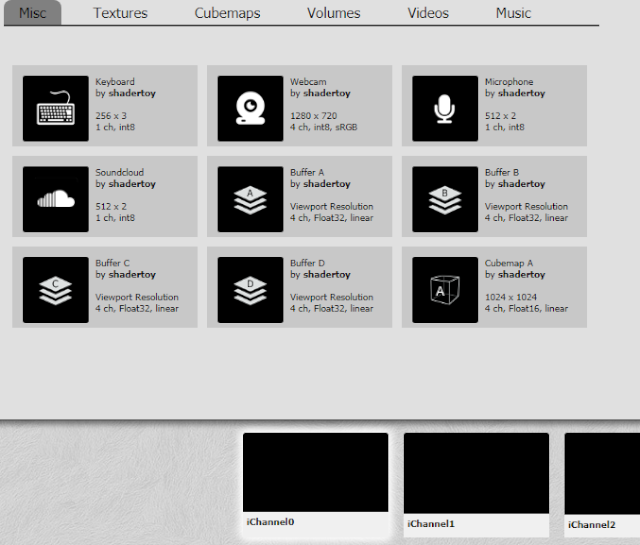
Click on iChannel0 and select the BufferA, see the next image:
I change teh default BufferA source code with my old source code from another example:
// the my old example: https://www.shadertoy.com/view/XlSBz3
void mainImage( out vec4 fragColor, in vec2 fragCoord )
{
    vec2 uv = fragCoord.xy;
    // set center for circle
	vec2 center = iResolution.xy * 0.5;
    // set radius of circle
	float radius = 0.30 * iResolution.y;
    // create circle with delta and theta function
    // make delta
    float d = length(center - uv) - radius;
    // make theta with color transparency to 0.4 and set 1 for clamp
    // the clamp is a returned value computed as min(max( x , minVal ), maxVal ).
	float t = clamp(d, 0.4, 1.0);
	fragColor = vec4( t, center, (120,230,0));
}
Let's see one simple example:
sâmbătă, 18 septembrie 2021
Shadertoy: iChannel texture - 006.
Another simple example with the online shadertoy tool. In this example, I will show you how to use a webcam with a heat predator effect. And how to combine this effect with the webcam image.
vec3 predatorHeat(float v) {
float value = 1.0 - v;
return (0.5+0.5*smoothstep(0.0, 0.1, value))*vec3(
smoothstep(0.5, 0.3, value),
value < 0.3 ? smoothstep(0.0, 0.3, value) : smoothstep(1.0, 0.6, value),
smoothstep(0.4, 0.6, value)
);
}

void mainImage( out vec4 fragColor, in vec2 fragCoord )
{
// Normalized pixel coordinates (from 0 to 1)
vec2 uv = fragCoord/iResolution.xy;

vec4 temp = texture(iChannel0, uv);
vec4 temp2 = texture(iChannel1,uv);

float average = ((temp.r + temp.g + temp.b) / 2.5);

temp.rgb = vec3(predatorHeat(average));

if(uv.x > 0.5)
fragColor = temp;
else
fragColor = temp2;
}luni, 12 iulie 2021
Shadertoy: iChannel texture - 005.
This simple example is a kaleidoscope distorsion with math functions: sine and cosine.
You can see this book name it A Mathematical Kaleidoscope: Applications in Industry, Business and Science by B Conolly, S. Vajda how math can solve many issues.
You can change the parameters to see how they interact and how the distortions and use the mouse.
vineri, 9 iulie 2021
Shadertoy: iChannel texture - 004.
Here is a simple example that can help us understand a bit about the theory of spatial frequency.
This theory is used in various fields as wave propagation.
The example is very simple for a better understanding.
You can change the parameters to see how they interact and how the distortions are.
luni, 21 iunie 2021
Shadertoy: iChannel texture - 003.
In the last tutorial I add a sphere distortion and sphere distortion with movement.
Today I use iChannel2 ro get input from keyboard and use this input to move with an offset.
The source code is not perfect because I used multiple areas with texture and I add keyboard offset.
This can be solve easy if I use a buffer.
The main goal of this tutorial is to see how you can use keyboard with iChannel input.
sâmbătă, 19 iunie 2021
Shadertoy: iChannel texture - 002.
In the last example I created a surface with a texture by channel inputs.
Now, I add a sphere distortion and sphere distortion with movement.
This is the source code I used:
#define PI 3.1415926

void mainImage( out vec4 fragColor, in vec2 fragCoord )
{
    vec2 uv = fragCoord.xy / iResolution.xy;
    // get poins
    vec2 p = (2.0 * fragCoord - iResolution.xy) / iResolution.y;
    // set surface formula
    vec3 v = vec3(p.x, p.y, sqrt(1.0 - p.x * p.x - p.y * p.y));
    // create normals
    vec3 n = normalize(v);

    // https://en.wikipedia.org/wiki/Distortion_(optics)
    vec2 sphere_distortion = vec2(atan(n.z, n.x) / PI,0.00000001 * p.y);

    vec4 color = vec4(0.0,0.0,0.0,0.0);

    if (uv.x > 0.0 && uv.x < 0.5)
    {
   		//color = texture(iChannel0, vec2(1.0 - (uv.x/0.5),uv.y/0.5)+ sphere_distortion);
        // with movement iTime
        color = texture(iChannel0, vec2(1.0 * iTime- (uv.x/0.5),uv.y/0.5)+ sphere_distortion);
    }
    else if (uv.x > 0.5 && uv.x < 1.0)
    {
        //color = texture(iChannel1, vec2((uv.x/0.5),uv.y)+ sphere_distortion);
        // with movement iTime
        color = texture(iChannel0, vec2(iTime-(uv.x/0.5),uv.y)+ sphere_distortion);

    }
	fragColor = color;
}miercuri, 16 iunie 2021
Shadertoy: iChannel texture - 001.
In this example with shadertoy online tool I will show you how to map a texture from iChannel texture input and UV areas.
 void mainImage( out vec4 fragColor, in vec2 fragCoord )
{
vec2 uv = fragCoord.xy / iResolution.xy;

   vec4 color = vec4(0.0,0.0,0.0,0.0);

    if (uv.x > 0.0 && uv.x < 0.5)
    {
   		color = texture(iChannel0, vec2(1.0 - (uv.x/0.5), uv.y/0.5));
    }
    else if (uv.x > 0.5 && uv.x < 1.0)
    {
        color = texture(iChannel1, vec2(1.0 - (uv.x/0.5), uv.y));
    }
	fragColor = color;
}
You can see this example online:
sâmbătă, 12 iunie 2021
Shadertoy: create the environment - 001.
Today I will show you two ways to create an environment using shader toy online tool.
One uses a cube map and the other uses the classic ray marching method.
Both examples are mathematically simple to understand.
For a better understanding of the method ray marching you can see this link.
luni, 1 februarie 2021
Shadertoy: Modulo N and shader effects.
You can see easily how the math function modulo n affects the shaders.
These three colors are the result of the function modulo n.
You can see two vectors with two modulo ivec areas with these values: 6 and 3.
You can make changes and you see similar results.
A good math teacher can explain why this is happening.
Let me give you a hint: encryption and decryption theories.
Abonați-vă la:
Comentarii (Atom)