Pages

Se afișează postările cu eticheta javascript. Afișați toate postările

sâmbătă, 30 septembrie 2017

The EaselJS java script libraries.

The team development teel us:
A suite of modular libraries and tools which work together or independently to enable rich interactive content on open web technologies via HTML5.
  • EASELJS - working with the HTML5 Canvas;
  • TWEENJS - for tweening and animating HTML5 and JavaScript properties;
  • SOUNDJS -  work with audio on the web;
  • PRELOADJS - manage and co-ordinate the loading of assets and data;
These javascript libraries are used and used to create web content for all modern desktop and mobile browsers.
To include the EaselJS libraries in your project by linking to the CreateJS CDN it is necessary to link them with script tag :
src="https://code.createjs.com/easeljs-0.8.2.min.js"
The official site offers readers only some modest demo about the capabilities of these libraries for creating web content.

marți, 19 septembrie 2017

Using processing.js to test ControlP5 .

The ControlP5 is a gui library written by Andreas Schlegel for the programming environment processing.
You can add this library open the processing IDE and under menu select Tools -> Add Tool ... . Use editbox to search the library named ControlP5 .
You can find many examples on official website.
Let's see how is look the Textarea GUI using processing IDE - official website example:


vineri, 15 septembrie 2017

Using processing.js to make a rotating ball effect .

This tutorial show us how to make a rotating ball effect. You can see the background is not black and the reason is the background is set just into setup function. Another part of this effect is the rect function from draw. This rect will clean the ball. The ball is a ecllipse function with a size a 10. The pushMatrix function pushes the current transformation matrix onto the matrix stack.
float angle;
int dist_ball = 100;

void setup() {
  size(800, 600);
  background(0);
}

void draw() {
  fill(20,20);

  noStroke();
  rect(0,0,width, height);
  fill(255);

  translate(width/2, height/2);

  rotate(angle);

  pushMatrix();
   rotate(angle);
   translate(dist_ball,0);
   ellipse(0, 0, 10, 10);
  popMatrix();
 
  angle += 0.1;
}
The result is this effect:

miercuri, 13 septembrie 2017

Using processing.js to make a clock.

Is a simple way to make and test processing.js online by using this online tool.
First you need to sign in into your account and use button : Create a Sketches .
This will open your open the editor. Now you need to add this source code:
void setup() {
  size(200, 200);
  stroke(10);
  smooth();
}
void draw() {
  background(255);
  fill(0);
  noStroke();
  // Angles for sin() and cos() start at 3 o'clock;
  // subtract HALF_PI to make them start at the top
  ellipse(100, 100, 160, 160);
  float s = map(second(), 0, 60, 0, TWO_PI) - HALF_PI;
  float m = map(minute(), 0, 60, 0, TWO_PI) - HALF_PI;
  float h = map(hour() % 12, 0, 12, 0, TWO_PI) - HALF_PI;
  stroke(255);
  strokeWeight(1);
  line(100, 100, cos(s) * 72 + 100, sin(s) * 72 + 100);
  strokeWeight(2);
  line(100, 100, cos(m) * 60 + 100, sin(m) * 60 + 100);
  strokeWeight(4);
  line(100, 100, cos(h) * 50 + 100, sin(h) * 50 + 100);
}
The source code is simple:

  • one first function setup will set size area and some line settings; 
  • the draw function loops continuously to draw your work. 

Into the draw function I create a clock design and the movement is follow by time.
Because this is analog clock , I used sin functions to move the line to show the analog clock hands for time.
Take a look into the right area and will see three vertical dots.
Use mouse and a side panel will show you. In this panel you can set Settings and upload Files.
The Settings will come with the Mode to set the javascript - P5js/Processingjs and Tabs to show/hide your work.
Let's see how is working:

miercuri, 6 septembrie 2017

Try processing js on Android OS.

If you like to code in processing.js, then this application will fulfill your wish on your phone or tablet with android operating system.
The APDE - Android Processing IDE requires the following permissions:
  • modify and delete the contents of your USB storage - required to save sketches to the external storage 
  • control vibration - required to provide haptic feedback, which can be turned off in Settings 
This includes a quick-run JavaScript - Sandbox and a tutorials that are explained in more details.
The development team from CalsignLabs has just one person.
This tell us about this alpha released application:

APDE (Android Processing Development Environment) is an integrated development environment for creating Processing sketches on your phone/tablet. APDE supports the full edit, compile, and run cycle. You don't need a computer or an SDK to start coding on the go.

The application can be found on google play here.

vineri, 11 august 2017

The phaser.io - web game engine .

If you want to develop a online game then you can try Phaser from official website.
The development team tell us about this game engine: Phaser is free and open-source and always will be. To be better understood, the development team put a lot of examples of source code and online output on the official website. If don't want a github cloning, or setting up a local web server, you can run phaser in the cloud. You can test it with shaders, games created by developers. I did not find a YouTube channel, but the internet is full of tutorials for this javascript game engine.

joi, 27 iulie 2017

Another online editor for three.js projects.

The framework named three.js let you to create cameras, objects, lights, materials and more, and you have a choice of renderer.
The default editor of this framework can be found here.
Today I will introduce you a new editor that allows you to edit html online.
From my point of view, this new editor is a more versatile way of creating content with this framework.

You can load this new editor here, here is a screenshot:


marți, 20 septembrie 2016

Mandelbrot with three.js .

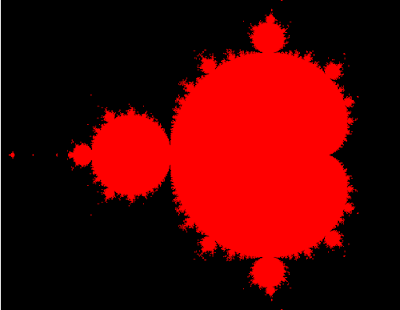
The Mandelbrot set is the set of complex numbers c for which the function f c ( z ) = z 2 + c . - wikipedia.org

You need to download the three.js - java script from threejs webpage.
The source code is simple. Come with default HTML5 page and javascripts.
One part of this will make vertex-shader and fragment shader, both is 2D shader type.
You need the canvas tag with id="canv".
The last part of source code is make to put all into one image processing by shaders.
You can read this tutorial here.

 <!DOCTYPE html>  
 <html>  
 <head>  
 <meta charset="UTF-8">  
 <title>Title of the document</title>  
 <script src="three.js"></script>  
 </head>  
 <body>  
   
 <canvas id="canv" width="640" height="480"></canvas>  
   
 <script id="2d-vertex-shader" type="x-shader/x-vertex">  
 attribute vec2 a_position;  
  void main() {  
   gl_Position = vec4(a_position, 0, 1);  
  }  
 </script>  
   
 <script id="2d-fragment-shader" type="x-shader/x-fragment">  
  #ifdef GL_FRAGMENT_PRECISION_HIGH  
   precision highp float;  
  #else  
   precision mediump float;  
  #endif  
  #define PI 3.14159  
   
 float hash( float n ) { return fract(sin(n)*753.5453123); }  
   
 #define NUM_STEPS  50  
  #define ZOOM_FACTOR 2.0  
  #define X_OFFSET  0.5  
   
  #ifdef GL_FRAGMENT_PRECISION_HIGH  
   precision highp float;  
  #else  
   precision mediump float;  
  #endif  
  precision mediump int;  
   
  void main() {  
   vec2 z;  
   float x,y;  
   int steps;  
   float normalizedX = (gl_FragCoord.x - 320.0) / 640.0 * ZOOM_FACTOR *  
             (640.0 / 480.0) - X_OFFSET;  
   float normalizedY = (gl_FragCoord.y - 240.0) / 480.0 * ZOOM_FACTOR;  
   
   z.x = normalizedX;  
   z.y = normalizedY;  
   
   for (int i=0;i<NUM_STEPS;i++) {  
   
   steps = i;  
   
     x = (z.x * z.x - z.y * z.y) + normalizedX;  
     y = (z.y * z.x + z.x * z.y) + normalizedY;  
   
     if((x * x + y * y) > 4.0) {  
      break;  
     }  
   
     z.x = x;  
     z.y = y;  
   
   }  
   
   if (steps == NUM_STEPS-1) {  
    gl_FragColor = vec4(1.0, 0.0, 0.0, 1.0);  
   } else {  
    gl_FragColor = vec4(0.0, 0.0, 0.0, 1.0);  
   }  
  }  
 </script>  
 <script type="text/javascript">  
 var gl;  
 var canvas;  
 var buffer;  
  window.onload = init;  
    
  function init() {  
    
   
   canvas    = document.getElementById('canv');  
   gl      = canvas.getContext('experimental-webgl');  
   canvas.width = 640;  
   canvas.height = 480;  
    
   gl.viewport(0, 0, gl.drawingBufferWidth, gl.drawingBufferHeight);  
   
 var shaderScript;  
 var shaderSource;  
 var vertexShader;  
 var fragmentShader;  
   
  buffer = gl.createBuffer();  
  gl.bindBuffer(gl.ARRAY_BUFFER, buffer);  
  gl.bufferData(  
   gl.ARRAY_BUFFER,   
   new Float32Array([  
    -1.0, -1.0,   
     1.0, -1.0,   
    -1.0, 1.0,   
    -1.0, 1.0,   
     1.0, -1.0,   
     1.0, 1.0]),   
   gl.STATIC_DRAW  
  );  
   
   render();  
    
  }  
    
 function render() {  
    
   window.requestAnimationFrame(render, canvas);  
    
   gl.clearColor(1.0, 0.0, 0.0, 1.0);  
   gl.clear(gl.COLOR_BUFFER_BIT);  
   
  shaderScript = document.getElementById("2d-vertex-shader");  
  shaderSource = shaderScript.text;  
  vertexShader = gl.createShader(gl.VERTEX_SHADER);  
  gl.shaderSource(vertexShader, shaderSource);  
  gl.compileShader(vertexShader);  
   
  shaderScript  = document.getElementById("2d-fragment-shader");  
  shaderSource  = shaderScript.text;  
  fragmentShader = gl.createShader(gl.FRAGMENT_SHADER);  
  gl.shaderSource(fragmentShader, shaderSource);  
  gl.compileShader(fragmentShader);  
   
  program = gl.createProgram();  
  gl.attachShader(program, vertexShader);  
  gl.attachShader(program, fragmentShader);  
  gl.linkProgram(program);   
  gl.useProgram(program);  
  positionLocation = gl.getAttribLocation(program, "a_position");  
  gl.enableVertexAttribArray(positionLocation);  
  gl.vertexAttribPointer(positionLocation, 2, gl.FLOAT, false, 0, 0);  
   
  gl.drawArrays(gl.TRIANGLES, 0, 6);  
  }  
 </script>  
 </body>  
 </html>