Another example with shadertoy online tool.
The example come with all comments to understand how the sine function is show on shadertoy website.
Se afișează postările cu eticheta shader. Afișați toate postările
Se afișează postările cu eticheta shader. Afișați toate postările
joi, 2 ianuarie 2020
joi, 21 noiembrie 2019
Shadertoy: The flag of Romania - 002.
This is another step about learning shaders.
The old example can be updated with this source code.
I commented on the source code to see step by step how this working.
One way to understand how this working to the final result is to going back on the shader structures that generate output to the basic elements of the shader.
If we apply this case to solve the problem then from the display a color like a vec4 color for fragColor adding a sin function to wave the result, and so on.
Right, this code can be optimized in many ways depending on the result.
// learning process area step by step
// the gl_FragColor is a vec4 type of float values in the range 0 to 1.
// because the values are from 0 to 1  this can used in many ways with for domain and range
void mainImage( out vec4 fragColor, in vec2 fragCoord )
{
    // Normalized pixel coordinates (from 0 to 1)
    vec2 uv = fragCoord/iResolution.xy;
    // define a vec2 and uv can be divide to create waves
    // use this to see the difference
    // vec2 valul = vec2(0.01,1.0);
    vec2 valul = vec2(0.5,1.0);
    // define a vec2 this vector will be the vector of shadow
    vec2 unghi_valul = vec2(0.5,1.0);
    // this float will speed the animation with iTime
    float viteza = 3.0;
    // with the dot we can calculate the dot product of two vectors and result can be a shadow
    // the result of unghi can be changed when change the vectors and vectors math rules
    float unghi = dot(uv/valul, unghi_valul) - iTime * viteza;
    // the output can be used with sin to create a shadow wave
    // fill the screen with red
    fragColor = vec4(1,0,0,0) * sin(unghi);
    // fill the 2/3 of size with yellow color
    if(uv.x<(1.0/1.5))
    fragColor = vec4(1,1,0,0)  * sin(unghi);
    // fill the last 1/3 with the blue color
    if(uv.x<1.0/3.0)
    fragColor = vec4(0,0,1,0)  * sin(unghi);
}miercuri, 20 noiembrie 2019
Shadertoy: The flag of Romania - 001.
Today I make the flag of Romania.
About this flag you can read at Wikipedia.
The goal of this simple tutorial is to learn the link between iResolution and the fill areas.
First, you need to normalized pixel coordinates from 0 to 1.
The gl_FragColor is a vec4 type of float values in the range 0 to 1.
We can use this property by fill the areas of the screen.
The example can be changed to use the RGBA.
The source code is this:
void mainImage( out vec4 fragColor, in vec2 fragCoord )
{
    // Normalized pixel coordinates (from 0 to 1)
    vec2 uv = fragCoord/iResolution.xy;
    // Output to screen
    // fill the screen with red
    fragColor = vec4(1,0,0,0);
    // fill the 2/3 of size with yellow color
    if(uv.x<(1.0/1.5))
    fragColor = vec4(1,1,0,0);
    // fill the last 1/3 with the blue color
if(uv.x<1 .0="" code="" fragcolor="vec4(0,0,1,0);">miercuri, 6 noiembrie 2019
Shadertoy: Simple sky with shadertoy tool.
Today I create a simple sky with the online tool shadertoy.
I used Fedora 30 distro Linux and my old video card:
I used Fedora 30 distro Linux and my old video card:
VGA compatible controller: NVIDIA Corporation GT218 [GeForce 210] (rev a2)miercuri, 18 septembrie 2019
CodePen: Include shadertoy example in the webpage.
This issue can be solve it easy.
You need to get the iframe share from you shadertoy example.
Then use my example HTML and CSS from my codepen example.
You can remove the javascript code from example.
This javascript code is used to show the formula of sphere. I used my shadertoy example named Ray Marching - 001.
You need to get the iframe share from you shadertoy example.
Then use my example HTML and CSS from my codepen example.
You can remove the javascript code from example.
This javascript code is used to show the formula of sphere. I used my shadertoy example named Ray Marching - 001.
marți, 12 februarie 2019
Godot : water shader example.
This is an example created by user named Gonkee in this video tutorial.
The result of this shader tutorial I tested is this:
The source code of this shader is this:
The result of this shader tutorial I tested is this:
The source code of this shader is this:
shader_type canvas_item;

// Gonkee's water shader for Godot 3 - full tutorial https://youtu.be/uhMAHpV_cDg
// If you use this shader, I would prefer if you gave credit to me and my channel

uniform vec4 blue_tint : hint_color;

uniform vec2 sprite_scale;
uniform float scale_x = 0.67;

float rand(vec2 coord){
 return fract(sin(dot(coord, vec2(12.9898, 78.233)))* 43758.5453123);
}

float noise(vec2 coord){
 vec2 i = floor(coord);
 vec2 f = fract(coord);

 // 4 corners of a rectangle surrounding our point
 float a = rand(i);
 float b = rand(i + vec2(1.0, 0.0));
 float c = rand(i + vec2(0.0, 1.0));
 float d = rand(i + vec2(1.0, 1.0));

 vec2 cubic = f * f * (3.0 - 2.0 * f);

 return mix(a, b, cubic.x) + (c - a) * cubic.y * (1.0 - cubic.x) + (d - b) * cubic.x * cubic.y;
}

void fragment(){

 vec2 noisecoord1 = UV * sprite_scale * scale_x;
 vec2 noisecoord2 = UV * sprite_scale * scale_x + 4.0;

 vec2 motion1 = vec2(TIME * 0.3, TIME * -0.4);
 vec2 motion2 = vec2(TIME * 0.1, TIME * 0.5);

 vec2 distort1 = vec2(noise(noisecoord1 + motion1), noise(noisecoord2 + motion1)) - vec2(0.5);
 vec2 distort2 = vec2(noise(noisecoord1 + motion2), noise(noisecoord2 + motion2)) - vec2(0.5);

 vec2 distort_sum = (distort1 + distort2) / 60.0;

 vec4 color = textureLod(SCREEN_TEXTURE, SCREEN_UV + distort_sum, 0.0);

 color = mix(color, blue_tint, 0.3);
 color.rgb = mix(vec3(0.5), color.rgb, 1.4);

 float near_top = (UV.y + distort_sum.y) / (0.2 / sprite_scale.y);
 near_top = clamp(near_top, 0.0, 1.0);
 near_top = 1.0 - near_top;

 color = mix(color, vec4(1.0), near_top);

 float edge_lower = 0.6;
 float edge_upper = edge_lower + 0.1;

 if(near_top > edge_lower){
  color.a = 0.0;

  if(near_top < edge_upper){
   color.a = (edge_upper - near_top) / (edge_upper - edge_lower);
  }
 }

 COLOR = color;
}miercuri, 16 ianuarie 2019
Shadertoy: Shader objects with raymarching technique.
Another article about shader raymarching technique for today.
It's like the previous article created from the official video channel named The Art of Code.
The source code show how to create the basics objects like: capsule, torus, cube and cylinder.
The result of the source code of raymarching objects can be found on my account of ShaderToy website named catafest.
marți, 15 ianuarie 2019
Shadertoy: About raymarching technique with source code.
The raymarching technique is a fairly new technique used to render realtime scenes and it is entirely computed in a screen-space shader.
The raymarching is similar to traditional raytracing (in that a ray is cast into the scene for each pixel) but is not the same technique.
How this works:
We have in a fragment shader is the position of the point we are rendering in world 3D coordinates and the view direction from the camera.
For each ray is extended by step in the view direction, until it hits something and creates a point.
This is the simple raymarching used a constant step.
The next step is the optimization calls for the use of signed distance fields.
A distance field is a function that takes in a point as input and returns the shortest distance from that point to the surface any object in the scene similar with a sphere around the hit point.
Distance fields allow us to limit how often we need to sample when marching along the ray, this is the reason of the named raymarching.
You can follow this technique on the official video channel named The Art of Code.
The result of the source code of raymarching example from this video tutorial can be found on my account of ShaderToy website.
luni, 7 ianuarie 2019
Shadertoy: Flame 2D by catafest.
I create another shader using the shadertoy online tool.
This online tool helps users to understand the shaders theory.
All of the shaders theory is based on the math of graphics.
My example uses the basic shader for a 2D flame with minimal parameters to understand easier the math of this shader.
Let's see the source code:
This online tool helps users to understand the shaders theory.
All of the shaders theory is based on the math of graphics.
My example uses the basic shader for a 2D flame with minimal parameters to understand easier the math of this shader.
Let's see the source code:
// define iTime like Shader Inputs
#define time iTime
void mainImage( out vec4 fragColor, in vec2 fragCoord )
{
    // Normalized pixel coordinates (from 0 to 1)
    // vec2 uv = fragCoord/iResolution.xy;
 // create center of position of flame by xy and sized
 vec2 pos = ( fragCoord.xy / iResolution.xy )*2.0-vec2(1.,1.);
    // create flame variation
    if(pos.y>-3.0){
  // variation by time and set up to -3.0
        // the 0.1 and 30 parameters create the variation of flame
        // with ths sin and fract functions
        pos.y += 0.1*fract(sin(30.0*time));
 }
    // select background to black
 vec3 color = vec3(0.0,0.0,0.0);
 // set scale of flame
 float p =.001;
    // create shape of flame (output y)
 float y = pow(abs(pos.x),3.0)/(1.0*p)*1.0;
 // create the hight of flame
 float flame_out = length(pos+vec2(pos.x,y))*sin(0.9);
 // fix colors flame by RGB
 if(flame_out < 0.9){
        // color for RG (red green)
  color.rg += smoothstep(0.0,0.3,0.6-flame_out);
        // fix color of flame by G (green)
  color.g /=2.4;
 }
 color += pow(color.r,1.0);
 // output color
    fragColor = vec4(color,1.0);

}sâmbătă, 11 august 2018
Shadertoy: New shader example : Old watch (IBL) .
This is a great example at shadertoy website.
The example come with this link to this article into first comment.
The example is simple but impressive.
What is interesting to see how some objects are created.
The example come with this link to this article into first comment.
The example is simple but impressive.
What is interesting to see how some objects are created.
float sdPlane( const vec3 p ) {
 return p.y;
}

float sdTorus( const vec3 p, const vec2 t ) {
  vec2 q = vec2(length(p.xz)-t.x,p.y);
  return length(q)-t.y;
}

float sdTorusYZ( const vec3 p, const vec2 t ) {
  vec2 q = vec2(length(p.yz)-t.x,p.x);
  return length(q)-t.y;
}

float sdTorusYX( const vec3 p, const vec2 t ) {
  vec2 q = vec2(length(p.yx)-t.x,p.z);
  return length(q)-t.y;
}
...sâmbătă, 12 mai 2018
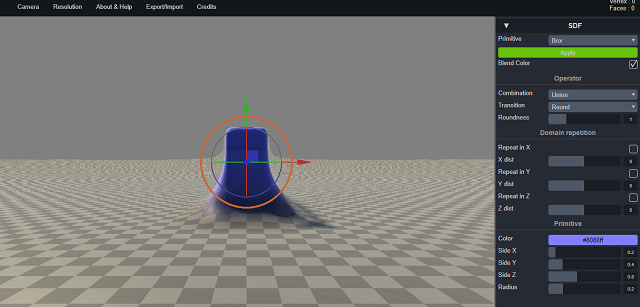
The editSDF online tool .
The editSDF is a project to experiment with raymarched signed distance field.
You can test with some 3D primitives : Sphere, Box,Torus, Capsule, Ellipsoid.
You can change parameters, combine all and export the output like a GLSL shader.
The tool is very good and easy to use.
You can test it here.
This is a screenshot with the editSDF online tool:
You can test with some 3D primitives : Sphere, Box,Torus, Capsule, Ellipsoid.
You can change parameters, combine all and export the output like a GLSL shader.
The tool is very good and easy to use.
You can test it here.
This is a screenshot with the editSDF online tool:
marți, 20 februarie 2018
Online book: The Book of Shaders .
This online book named The Book of Shaders by Patricio Gonzalez Vivo and Jen Lowe is a good start to learn and test shaders.
The authors tell us:
Getting started
What is a fragment shader?
In the previous chapter we described shaders as the equivalent of the Gutenberg press for graphics. Why? And more importantly: what's a shader?
If you already have experience making drawings with computers, you know that in that process you draw a circle, then a rectangle, a line, some triangles until you compose the image you want. That process is very similar to writing a letter or a book by hand - it is a set of instructions that do one task after another.
Shaders are also a set of instructions, but the instructions are executed all at once for every single pixel on the screen. That means the code you write has to behave differently depending on the position of the pixel on the screen. Like a type press, your program will work as a function that receives a position and returns a color, and when it's compiled it will run extraordinarily fast.
Why are shaders fast?
To answer this, I present the wonders of parallel processing.
Imagine the CPU of your computer as a big industrial pipe, and every task as something that passes through it - like a factory line. Some tasks are bigger than others, which means they require more time and energy to deal with. We say they require more processing power. Because of the architecture of computers the jobs are forced to run in a series; each job has to be finished one at a time. Modern computers usually have groups of four processors that work like these pipes, completing tasks one after another to keeping things running smoothly. Each pipe is also known as a thread.
Video games and other graphic applications require a lot more processing power than other programs. Because of their graphic content they have to do huge numbers of pixel-by-pixel operations. Every single pixel on the screen needs to be computed, and in 3D games geometries and perspectives need to be calculated as well.
You can test online the shader editor on this webpage.
duminică, 21 ianuarie 2018
The glslbin online tool .
This web tool named glslbin can help you to test your shaders online.
Is very simple to use it:
glslbin is a fragment shader sandbox similar to ShaderToy or GLSL Sandbox. It's still a work in progress, so expect more to come soon. It adds support for glslify, a GLSL module system which allows you to easily pull in shared code snippets from npm. These modules are all hosted as part of the stack.gl project: you can find a full list of packages in the "Shader Components" section here. Enjoy!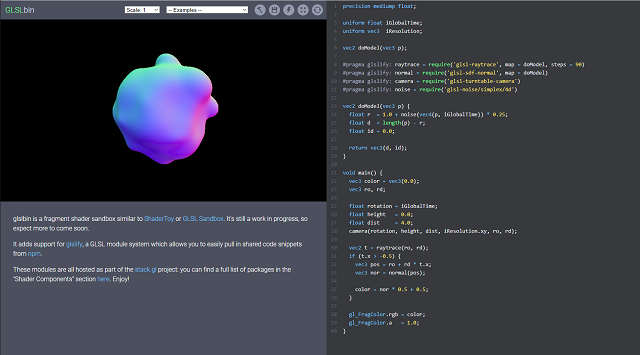
Is very simple to use it:
- open the tool;
- delete the source code or change the example;
- run your work ;
- you can also save it.
glslbin is a fragment shader sandbox similar to ShaderToy or GLSL Sandbox. It's still a work in progress, so expect more to come soon. It adds support for glslify, a GLSL module system which allows you to easily pull in shared code snippets from npm. These modules are all hosted as part of the stack.gl project: you can find a full list of packages in the "Shader Components" section here. Enjoy!
sâmbătă, 8 iulie 2017
The ShaderPlay Studios company.
About this company we can find out more on the official website:
ShaderPlay Studios is a software development company operating out of Playa Vista, California and founded on January of 2014 by Scott Bean, a veteran graphics engineer with 20 years of experience in the 3D software and gaming industry. The primary focus of ShaderPlay Studios is to give artists and engineers the tools they need to streamline their pipelines, iterate faster and ultimately create more meaningful digital content.
This development company come with tree software:
- NodeFlex is a very powerful, programmable node-based data generator designed to greatly simplify any tedious, redundant and error-prone data authoring tasks.
- ShaderFlex is a new breed of stand-alone code-based HLSL shader editors developed to take full advantage of DirectX 11/12.
- RenderFlex is a real-time viewer for ShaderFlex users to distribute and showcase their shader creations without giving away any of their proprietary source code or assets.
sâmbătă, 13 mai 2017
The Shdr online tool for GLSL (ESSL) .
The Shdr is an online GLSL (ESSL) shader editor, viewer and validator.
This tool is written in CoffeeScript and WebGL.
The GLSL editor supports many advanced features like syntax highlighting, history, line count and highlighting, error display and bracket matching to name a few.
You can test this tool at shdr online tool.
Using the top menu you can use local storage, raw code download and sharing, switching between vertex and fragment shader editing, insertion of snippets, change the 3D objects.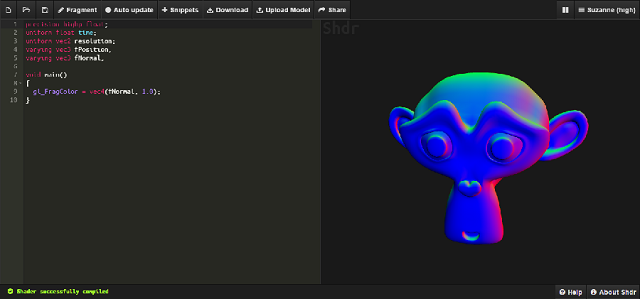
marți, 20 septembrie 2016
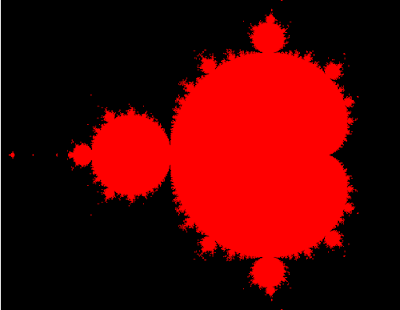
Mandelbrot with three.js .
The Mandelbrot set is the set of complex numbers c for which the function f c ( z ) = z 2 + c . - wikipedia.org
You need to download the three.js - java script from threejs webpage.
The source code is simple. Come with default HTML5 page and javascripts.
One part of this will make vertex-shader and fragment shader, both is 2D shader type.
You need the canvas tag with id="canv".
The last part of source code is make to put all into one image processing by shaders.
You can read this tutorial here.
 <!DOCTYPE html>
 <html>
 <head>
 <meta charset="UTF-8">
 <title>Title of the document</title>
 <script src="three.js"></script>
 </head>
 <body>

 <canvas id="canv" width="640" height="480"></canvas>

 <script id="2d-vertex-shader" type="x-shader/x-vertex">
 attribute vec2 a_position;
  void main() {
   gl_Position = vec4(a_position, 0, 1);
  }
 </script>

 <script id="2d-fragment-shader" type="x-shader/x-fragment">
  #ifdef GL_FRAGMENT_PRECISION_HIGH
   precision highp float;
  #else
   precision mediump float;
  #endif
  #define PI 3.14159

 float hash( float n ) { return fract(sin(n)*753.5453123); }

 #define NUM_STEPS  50
  #define ZOOM_FACTOR 2.0
  #define X_OFFSET  0.5

  #ifdef GL_FRAGMENT_PRECISION_HIGH
   precision highp float;
  #else
   precision mediump float;
  #endif
  precision mediump int;

  void main() {
   vec2 z;
   float x,y;
   int steps;
   float normalizedX = (gl_FragCoord.x - 320.0) / 640.0 * ZOOM_FACTOR *
             (640.0 / 480.0) - X_OFFSET;
   float normalizedY = (gl_FragCoord.y - 240.0) / 480.0 * ZOOM_FACTOR;

   z.x = normalizedX;
   z.y = normalizedY;

   for (int i=0;i<NUM_STEPS;i++) {

   steps = i;

     x = (z.x * z.x - z.y * z.y) + normalizedX;
     y = (z.y * z.x + z.x * z.y) + normalizedY;

     if((x * x + y * y) > 4.0) {
      break;
     }

     z.x = x;
     z.y = y;

   }

   if (steps == NUM_STEPS-1) {
    gl_FragColor = vec4(1.0, 0.0, 0.0, 1.0);
   } else {
    gl_FragColor = vec4(0.0, 0.0, 0.0, 1.0);
   }
  }
 </script>
 <script type="text/javascript">
 var gl;
 var canvas;
 var buffer;
  window.onload = init;

  function init() {


   canvas    = document.getElementById('canv');
   gl      = canvas.getContext('experimental-webgl');
   canvas.width = 640;
   canvas.height = 480;

   gl.viewport(0, 0, gl.drawingBufferWidth, gl.drawingBufferHeight);

 var shaderScript;
 var shaderSource;
 var vertexShader;
 var fragmentShader;

  buffer = gl.createBuffer();
  gl.bindBuffer(gl.ARRAY_BUFFER, buffer);
  gl.bufferData(
   gl.ARRAY_BUFFER,
   new Float32Array([
    -1.0, -1.0,
     1.0, -1.0,
    -1.0, 1.0,
    -1.0, 1.0,
     1.0, -1.0,
     1.0, 1.0]),
   gl.STATIC_DRAW
  );

   render();

  }

 function render() {

   window.requestAnimationFrame(render, canvas);

   gl.clearColor(1.0, 0.0, 0.0, 1.0);
   gl.clear(gl.COLOR_BUFFER_BIT);

  shaderScript = document.getElementById("2d-vertex-shader");
  shaderSource = shaderScript.text;
  vertexShader = gl.createShader(gl.VERTEX_SHADER);
  gl.shaderSource(vertexShader, shaderSource);
  gl.compileShader(vertexShader);

  shaderScript  = document.getElementById("2d-fragment-shader");
  shaderSource  = shaderScript.text;
  fragmentShader = gl.createShader(gl.FRAGMENT_SHADER);
  gl.shaderSource(fragmentShader, shaderSource);
  gl.compileShader(fragmentShader);

  program = gl.createProgram();
  gl.attachShader(program, vertexShader);
  gl.attachShader(program, fragmentShader);
  gl.linkProgram(program);
  gl.useProgram(program);
  positionLocation = gl.getAttribLocation(program, "a_position");
  gl.enableVertexAttribArray(positionLocation);
  gl.vertexAttribPointer(positionLocation, 2, gl.FLOAT, false, 0, 0);

  gl.drawArrays(gl.TRIANGLES, 0, 6);
  }
 </script>
 </body>
 </html>
duminică, 8 septembrie 2013
Programming with shaders - part 001 .
If you want to working with shaders then you must know something about GLSL data types.
The GLSL data types it's like variables or any types of data from programming language.
Uniform variables
Let's show you this types versus C data types:
The uniform variables are used when is passed from OpenGL app to the shader.
Vertex Attributes
This can only be used with vertex shaders.
The atributes are position, normals, texture coordinates all you can use with GL_ARB-vertex_program.
The GL_ARB-vertex_program holds slots and after overwritten the attribute is lost.
The attributes can be:
In OpenGL you used something like this:
To working ( access ) with the attribute in shader source code , just use this:
Varying variables.
This are used most to send data from vertex shader to fragment shader.
The most common example is texture coordinates from vertex shader to fragment shader.
But about how it's vertex and fragment shader in the next tutorial.
The GLSL data types it's like variables or any types of data from programming language.
Uniform variables
Let's show you this types versus C data types:
bool -- int conditional get true -- or false.
int -- int signed integer.
float -- float single floating-point scalar.
vec2 -- float[2] Two component floating-point vector.
vect3 -- float[3] Three component floating-point vector.
vec4 -- float[4] Four component floating-point vector.
bvec2 -- int[2] Two component Boolean vector.
bvec3 -- int[3] Three component Boolean vector.
bvec4 -- int[4] Four component Boolean vector.
ivec2 -- int[2] Two component signed integer vector.
ivec3 -- int[3] Three component signed integer vector.
ivec4 -- int[4] Four component signed integer vector.
mat2 -- float[4] 2x2 floating-point matrix.
mat3 float[9] 3x3 floating-point matrix.
mat4 -- float[16] 4x4 floating-point matrix.
sampler1D int for accessing a 1D texture.
sampler2D -- int for accessing a 2D texture.
sampler3D -- int for accessing a 3D texture.
samplerCube -- int for accessing a cubemap texture.
sampler1DShadow -- int for accessing a 1D depth texture.
sampler2DShadow -- int for accessing a 2D depth texture.. The uniform variables are used when is passed from OpenGL app to the shader.
Vertex Attributes
This can only be used with vertex shaders.
The atributes are position, normals, texture coordinates all you can use with GL_ARB-vertex_program.
The GL_ARB-vertex_program holds slots and after overwritten the attribute is lost.
The attributes can be:
arrays, structures,
float,
vec[2],vec[3],vec[4],
mat[2],mat[3],mat[4] In OpenGL you used something like this:
...
glBegin(GL_TRIANGLES);
...
glVertex3f(0,1,0);
glNormal3f(1,0,1);
glVertex3f(0,1,0);
glNormal3f(1,0,0);
...
glEnd();
... ...
int any_slot= 7;
...
glBindAttribLocationARB(my_program, any_slot, "my_attribute");
...
glBegin(GL_TRIANGLES);
...
glVertex3f(0,1,0);
glNormal3f(1,0,1);
glVertex3f(0,1,0);
glNormal3f(1,0,0);
...
glEnd();
... To working ( access ) with the attribute in shader source code , just use this:
attribute vec3 my_attribute; Varying variables.
This are used most to send data from vertex shader to fragment shader.
The most common example is texture coordinates from vertex shader to fragment shader.
But about how it's vertex and fragment shader in the next tutorial.
miercuri, 15 mai 2013
News about OpenGL 3 the interpolation qualifiers.
OpenGL 3 introduced three interpolation qualifiers.
The qualifiers is used vto modify the storage or behavior of global and locally defined variables.
flat - value will not be interpolated.
noperspective - value will be linearly interpolated in window-space.
smooth - value will be interpolated in a perspective.
Read more and see examples of this three interpolation qualifiers here.
sâmbătă, 20 aprilie 2013
Using SpiderGL to test shaders .
SpiderGL is a JavaScript 3D Graphics library which relies on WebGL for realtime rendering.
You can test it online using your browser using this website.
The website allow you to write shaders and also rendering the output.
Read more about shaders tutorial here.

joi, 11 august 2011
Shadertoy: Test your shader online.
If you want to learn and test 3D shader technology, then you can try Shader Toy v0.3 .
This web site allows you to write shaders and view the result .
It also comes with some useful examples .
More can be found on website .
This web site allows you to write shaders and view the result .
It also comes with some useful examples .
More can be found on website .
Abonați-vă la:
Postări (Atom)