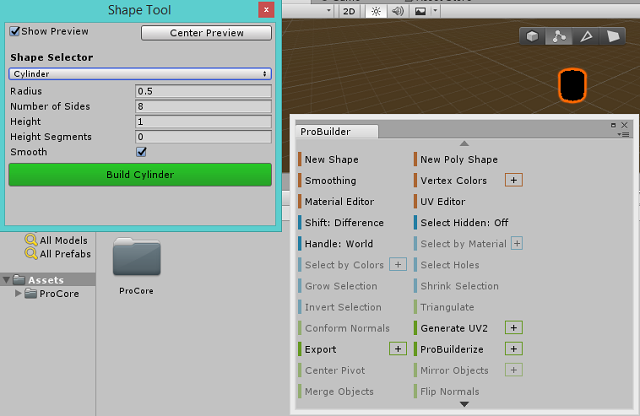
The development team tell with this shot intro:
Prototype Rapidly: Build basic or advanced geometry, right in Unity, with zero creative barriers.
Play Instantly: Playtest at any time, then edit immediately, and never leave Unity. No time (or sanity) wasted.
You can see many tutorials on official youtube channel, see this:
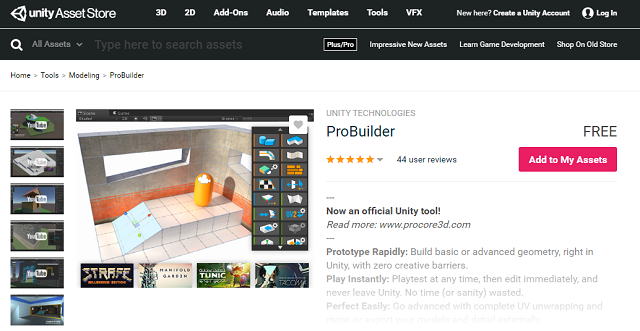
The install work into Asset Store tag area into your Unity 3D game engine.
You need to search with the word ProBuilder then use Download and Import buttons.
Next, You will see a window with all scripts and objects to import it ( use All and Import buttons).
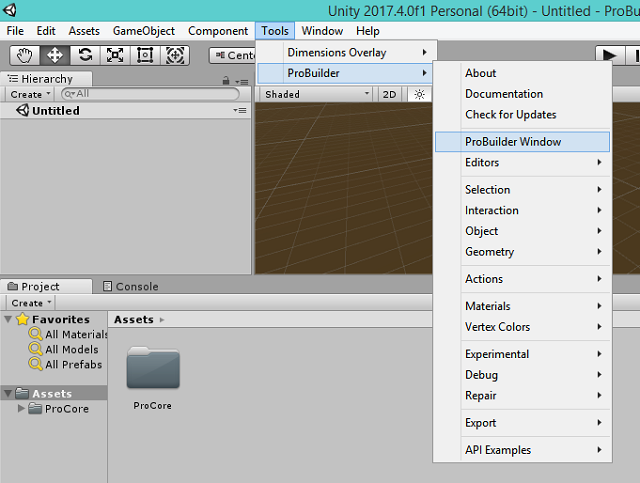
After the tool is install you can see a folder into Asset area and you can use this tool from: Main menu - Tools - ProBuilder .
This tool come with default 3D primitives and many features.
2D, 3D, game, games, online game, game development, game engine, programming, OpenGL, Open AI, math, graphics, design, graphic, graphics, game development, game engine, programming, web development, web art, web graphic, arts, tutorial, tutorials,
marți, 24 aprilie 2018
Unity3D : ProBuilder tool .
Posted by
Cătălin George Feștilă
Labels:
2018,
3D,
3d engine,
ProBuilder,
tool,
tutorial,
tutorials,
Unity
sâmbătă, 21 aprilie 2018
The new Blender 3D version 2.79b .
Today I tested the new Blender 3D software versin 2.79b and is working well.
I think the development team has worked hard and has done a great job with this version of Blender 3D software.
Here are some of the issues solved:
The new 2.79b is a Corrective Release
I think the development team has worked hard and has done a great job with this version of Blender 3D software.
Here are some of the issues solved:
The new 2.79b is a Corrective Release
This corrective release only fixes a few serious bugs/regressions introduced in 2.79a fixes.
- Due to various issues with drivers for AMD GCN 1.0 architecture, those cards are no longer supported for Cycles rendering
- When using add-ons in Blender 2.79 that take advantage of the new data-block pointer properties, the resulting .blend files can't be opened in earlier versions of Blender. Attempting to open such .blend files in Blender 2.78c and earlier may crash.
- Some Interface Themes may need to be reloaded to work properly.
- The text color contained in layout.box() is now defined in User Preferences, Themes, Box section
- Rig compatibility:
- Changes to IK snapping may affect rigs that use non-uniform IK scaling. (rigs created in the 2.78 builds.)
- During the 2.78 series: IK snapping was partly broken.
- This has been fixed for Blender 2.79
- Rigs created in Blender 2.78 may not be compatible with 2.79.
- Rigs created in Blender 2.77 may still work.
- When using the add-on Rigify, please note:
- Compatibility is broken for this release. There's no guarantee rigs created in previous Blender versions will work correctly.
- Rigs created in Blender 2.78 may not be compatible with 2.79.
- Rigs created in Blender 2.77 may still work.
- Save your work before attempting upgrading your rigs.
marți, 17 aprilie 2018
Hero - Grease Pencil 2.0 project of Blender team.
This video is made by the Blender team and is result of 2D graphic tool named Grease Pencil.
They presents a 3 minutes short film showcasing Blender’s upcoming Grease Pencil 2.0.
This tool works like a pen in the 3D area.
At the end of this video you can see the combined effects of 2D and 3D.
Now, 2D and 3D animations benefit from advanced technology that complies with the basic animation rules.
You can see it on official youtube channel :
vineri, 13 aprilie 2018
Using p5.js to create a progressbar .
This is an old tutorial about how to create a progressbar with processing.
To convert to p5.js you need to change the processing source code to javascript.
You can read about this conversion here.
In my example I change all variable types to var and I remove the frame.setTitle.
If you using the processing I.D.E. then you need to change from the right area from java to p5.js.
This will make a index.html file ( don't change this file).
This is the source code for p5.js and is working well:
// example progressbar
// default variables for progressbar
// start the time for progressbar
var startTime;
// counter progressbar
var counter;
// maximum time progressbar
var maxTime;
// boolean for the end progressbar
var done;
// settings for this example
function setup() {
// set title of window
//frame.setTitle("Example progressbar | free-tutorials.org");
// window size and background color
// p5.js
createCanvas(640,130);
//size(640,130);
background(25);
// set variables of progressbar
counter = 0;
startTime= millis();
maxTime=int(random(1000,1976));
done=false;
//end settings
}
// draw all text and progressbar
function draw() {
// set same background color
background(255);
// check end of progressbar fill
if (counter-startTime < maxTime) {
counter=millis();
} else { done=true; }
// create the color for fill progressbar
fill(110,110,255);
// no stroke for draw
noStroke();
// show all text variables and progressbar
text("Progress bar blue - size 620", 230, 20);
rect(10,30,map(counter-startTime,0,maxTime,0,620), 30 );
text("counter- startTime "+int(counter- startTime)+" ",10,80);
text("maxTime "+ int(maxTime) + " ", 10,100);
text("map converted counter-startTime"+ int ( map(counter-startTime,0,maxTime,0,200)), 10,120);
noFill();
}
// reload the draw of progress bar
function mousePressed () {
if (done) { counter = 0; startTime= millis();
maxTime=int(random(1000,1976));
done=false;
}
}
joi, 12 aprilie 2018
The Sploder online game engine.
This online game engine named Sploder use Flash plugin to create and play 8 bits games.
Is very use to create games because has templates for 2D games:.
You can play many type of games like: RPG Games, Defense Games, Girls Games, Crafting Games, Puzzle Games and more.
The development team come with this infos about this game engine:
Sploder is a place where anyone can make games online and share them with the world. Make your own platformer games, space-themed shoot-em-ups, retro arcade games, and even complex physics-based puzzle games. No programming skill is necessary. All you need is a good imagination and a desire to be creative.
Posted by
Cătălin George Feștilă
Labels:
2018,
game development,
game engine,
games,
online tool,
Sploder
miercuri, 4 aprilie 2018
About Blender 3D and python API versus learners.
The last version of Blender 3D API come with many features and option to solve your issues.
Too many for a normal user.
For example: if you want to add some images into SEQUENCE_EDITOR this will help you.
From starting you need to know the last API and this may not be the last option.
The BlendDataImages(bpy_struct) - version 2.79 and can be used.
Another option is this function on the version 2.78 the scene.sequence_editor.sequences.new_image.
The good way is to have a good area of examples and tutorials into documentation.
This will solve many post on Blender 3D community area.
What I want to say is the desire of the developers to manifest themselves and not to maintain the user learning process.
Most API learners do not have the same speed of processing and learning as developers, especially if there are multiple and frequent changes.
marți, 3 aprilie 2018
News : The WAVE ENGINE 2.0 .
This is a old news.
The development team of game engine come this text about the old game WAVE ENGINE :
WAVE ENGINE 2.0 HAS ARRIVED! NOW WITH A NEW VISUAL EDITOR AND AVAILABLE IN WINDOWS, MAC OSX AND LINUX. YOU CAN ALSO VISIT OUR GITHUB PAGE WHERE YOU CAN FIND TONS OF SAMPLES, QUICKSTARTERS AND COMPONENTS SOURCE CODE. ENJOY!
You can read more about WAVE ENGINE at official page.
You can see all about WAVE ENGINE on youtube official channel
Posted by
Cătălin George Feștilă
Labels:
2018,
2018 news,
game engine,
game programming,
news,
programming,
Wave engine
luni, 2 aprilie 2018
News : Online tool for CSS web development.
This is online tool named animista is a tool for web development and you can used to create source code for animation and CSS.
The tool come with beta version but works very well.
You can try this online tool here.
The tool come with beta version but works very well.
You can try this online tool here.
duminică, 1 aprilie 2018
The Construct game engine.
The Construct game engine is an HTML5-based 2D game editor features and improvements like: multi platform, event sheets, layout wiew,
multi language, steamlined interface and more.
Is simple to use and has a good learning area.
You can try new Construct 3 or old Construct 2 version .
You can read more about this game engine at official webpage .
Here is a video tutorial from official youtube channel.
Is simple to use and has a good learning area.
You can try new Construct 3 or old Construct 2 version .
You can read more about this game engine at official webpage .
Here is a video tutorial from official youtube channel.
vineri, 30 martie 2018
News : About Google Design .
Google Design is a cooperative effort led by a group of designers, writers, and developers at Google. We work across teams to create content and produce events that showcase Google’s design work and champion innovators in our field.
This website is a great option to learn and take a look at google design area.
The website share us this infos and data:
The job area is a redirect to google careers page .
Very good website with news and resources from google team.
This website is a great option to learn and take a look at google design area.
The website share us this infos and data:
- LIBRARY
- NEWS
- RESOURCES
- JOBS
- ABOUT
The job area is a redirect to google careers page .
Very good website with news and resources from google team.
duminică, 25 martie 2018
Create a shadow text effect with HTML5 and CSS .
This tutorial is simple because I used HTML5 and CSS.
The CSS source code is simple (see: font-size:13px or you can use any size, colors , background).
I used my jsfiddle account to test and run it.
Create a project into jsfiddle editor and add this source code.
Into HTML5 area the source code can start with your text into div tag and named class font_001.
You can add span tag to have display block CSS style.
Into CSS area the source code is this:
@import url(https://fonts.googleapis.com/css?family=Work+Sans);
body {
line-height: 2.5;
margin: 0;
background: #1F4C6F;
font-family: 'Work Sans' sans-serif;font-size:13px;
}
.font_001 {
max-width: 50%;
margin: 0 auto;
}
h1 {
color: #fff;
font-weight: 810;
padding-top: 4rem;
margin: 0;
text-transform: uppercase;
font-size: 3em;
line-height: 1.8;
color: #3C6FB0;
text-shadow: 20px 5px 30px rgba(0,0,0,.2), -30px 10px 30px rgba(0,0,0,.1),
-40px 10px 30px rgba(0,0,0,.1), -3px 2px 5px #1F4C6F, 3px -2px 5px #3C6FB0;
}
h1 span {
display: block;
}
Using processing.js to create a progressbar .
Today I tested the processing version 3.3.7 .
The example I make is a progressbar with a blue color and some text to show info.
The source code is very simple and result is this:
This is the source code:
The example I make is a progressbar with a blue color and some text to show info.
The source code is very simple and result is this:
This is the source code:
// example progressbar
// default variables for progressbar
// start the time for progressbar
int startTime;
// counter progressbar
int counter;
// maximum time progressbar
int maxTime;
// boolean for the end progressbar
boolean done;
// settings for this example
void setup() {
// set title of window
frame.setTitle("Example progressbar | free-tutorials.org");
// window size and background color
size(640,130);
background(255);
// set variables of progressbar
counter = 0;
startTime= millis();
maxTime=int(random(1000,1976));
done=false;
//end settings
}
// draw all text and progressbar
void draw() {
// set same background color
background(255);
// check end of progressbar fill
if (counter-startTime < maxTime) {
counter=millis();
} else { done=true; }
// create the color for fill progressbar
fill(110,110,255);
// no stroke for draw
noStroke();
// show all text variables and progressbar
text("Progress bar blue - size 620", 230, 20);
rect(10,30,map(counter-startTime,0,maxTime,0,620), 30 );
text("counter- startTime "+int(counter- startTime)+" ",10,80);
text("maxTime "+ int(maxTime) + " ", 10,100);
text("map converted counter-startTime"+ int ( map(counter-startTime,0,maxTime,0,200)), 10,120);
noFill();
}
// reload the draw of progress bar
void mousePressed () { if (done) { counter = 0; startTime= millis();
maxTime=int(random(1000,1976)); done=false; }
}
Posted by
Cătălin George Feștilă
Labels:
2018,
2D,
javascript,
processing,
programming,
tutorial,
tutorials
sâmbătă, 24 martie 2018
News : CRYENGINE V show us the HUNT game development .
In this period of the year developers meet at GDC - Game Development Conference.
The game engine named CRYENGINE V is proven in AAA production and come with one of latest rendering and game design features into the known game HUNT.
Abonați-vă la:
Postări (Atom)