The Krita development team tell us:
Published 10/11/2017
Today we are releasing Krita 3.3.1, a bugfix release for Krita 3.3.0. This release fixes two important regressions:
Krita would crash if you would restart Krita after closing Krita with the reference images docker set to floating
Krita 3.3.0 could not read .kra backup files or .kra files that were unzipped, then zipped up manually.
Additionally, there are the following fixes and improvements:
Fix a crash when creating a swap file on OSX (Bernhard Liebl).
Merge down does not remove locked layers anymore (Nikita Smirnov)
Various performance improvements, especially for macOS (Bernhard Liebl)
Improve the look and feel of dragging and dropping layers (Bernhard Liebl)
Improve the tooltips in the brush preset selector (Bernhard Liebl)
Fix a memory leak in the color selectors (Boudewijn Rempt)
Fix rotation and tilt when using the Windows Ink api (Alvin Wong)
Don’t allow the fill tool to be used on group layers (Boudewijn Rempt)
Add brightness and contrast sliders for textured brushes (Rad)
Add paste-at-cursor (Dmitry Kazakov)
Improve performance of the cpu canvas (Alvin Wong)
Fix a crash on closing Krita when there is something on the clipboard (Dmitry Kazakov)
Add a button to open a file layer’s image in Krita (Wolthera van Hövell tot Westerflier)
You can read more about this new version of Krita software and download it from here.
2D, 3D, game, games, online game, game development, game engine, programming, OpenGL, Open AI, math, graphics, design, graphic, graphics, game development, game engine, programming, web development, web art, web graphic, arts, tutorial, tutorials,
sâmbătă, 14 octombrie 2017
News: The new released Krita version 3.3.1 .
Posted by
Cătălin George Feștilă
 Labels:
2017 news,
2D,
drawing,
linux,
Linux 32,
Linux 64,
Mac OS,
open source,
OSX,
software,
tool,
windows 10
luni, 9 octombrie 2017
Blender 3D - simple gold material .
This tutorial show you how to make a simple gold material with Blender 3D - version 2.79 .
The base of this tutorial come from this link.
Open a new scene and add your object. Select the render from Blender Render to Cycles Render from top of the Blender 3D software.
Create a new material click on Use Nodes button from Material tab.
The next step is to chose screen layout to Compositing.
You will see a Node Editor and set this to Shader to edit your material.
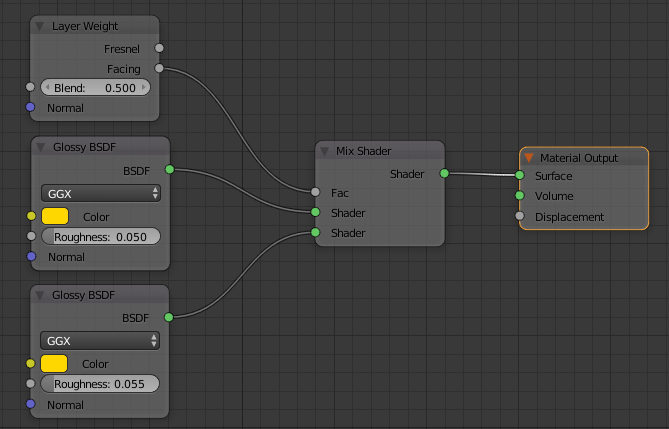
In this window you can change the material object from default Diffuse BSDF to new gold material.
Use Shift A keys to search and add all you need to make the gold material.
This is the result of nodes for this material:

sâmbătă, 7 octombrie 2017
Big prizes in objects .
Here's a contest for lovers around the world with awards prize graphics.
The website team tell us about this contest:
Once upon a time in a land far, far away, there was a tiny kingdom hidden away in the mountains. And while its people were happy and led good lives, in the back of their minds there was always the worry about what might be at the other side of the mountains…
Welcome to our new community contest! We’ll be going back to medieval times to explore castles, medieval towns, knights, and perhaps… dragons? Anything is possible in this Medieval Fantasy!
See this link.
miercuri, 4 octombrie 2017
Blender 3D - Open Shading Language tutorial - part 001 .
Using this tutorial about Open Shading Language, you can try a glass shader.
The source code show a simple use for Fresnel equations.
The backfacing() and raytype() are two functions that provide the shader some information about the
state of the renderer and the scene at the time of evaluation.
I used just backfacing(), because is a raw example of this Fresnel equations.
As you can see the I, N, eta inputs from Fresnel_Dielectric() is used to get a result variable fr.
The all result of this shader is bsdf like a equation.
See the next code:
#define IOR_THRESHOLD 1.000000001

float Fresnel_Dielectric(vector i, normal n, float eta)
{
//see https://en.wikipedia.org/wiki/Fresnel_equations
    float c = fabs(dot(i, n));
    float g = eta * eta - 1 + c * c;
    float result = 1.0;

    if (g > 0) {
        g = sqrt(g);
        float a = (g - c) / (g + c);
        float b = (c * (g + c) - 1) / (c * (g + c) + 1);
        result = 0.5 * a * a * (1 + b * b);
    }

    return result;
}

shader glass(
    color diffuse_col = 1.8,
    float ior = 1.45,
    output closure color bsdf = 0)
{
    float real_ior = max(ior, IOR_THRESHOLD);
    float eta = backfacing()? 1.0 / real_ior : real_ior;
    float fr = Fresnel_Dielectric(I, N, eta);

    bsdf = diffuse_col * (fr * reflection(N) + (1.0 - fr) * refraction(N, eta));
}
Posted by
Cătălin George Feștilă
 Labels:
2017,
3D,
blender,
Blender 3D,
Open Shading Language,
open source,
OSL,
source code,
tutorial,
tutorials
luni, 2 octombrie 2017
The Skanect software tool for 3D .
The official website come with this intro:
With Skanect, capturing a full color 3D model of an object, a person or a room has never been so easy and affordable. Skanect transforms your Structure Sensor, Microsoft Kinect or Asus Xtion camera into a low cost 3D scanner able to create 3D meshes out of real scenes in a few minutes. Enter the world of 3D scanning now!
Come with free and paid solution, need a good 3D sensor ( see official features on web) and GPU with CUDA.
I install this software and has a good interface.
duminică, 1 octombrie 2017
The Storyboarder free tool.
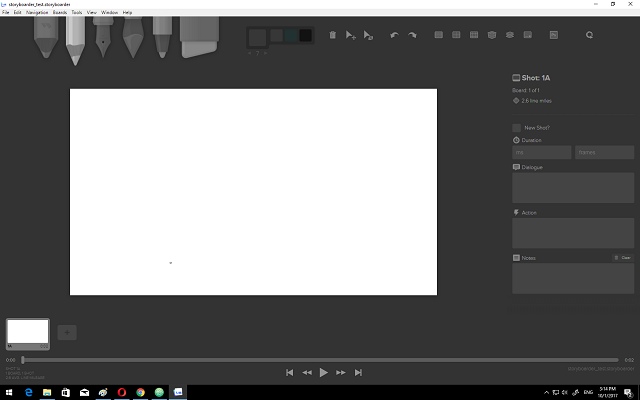
The development team tell us about this free tool named Storyboarder:
Storyboarder makes it easy to visualize a story as fast you can draw stick figures. Quickly draw to test if a story idea works. Create and show animatics to others. Express your story idea without making a movie.
...
Wonder Unit is a studio that makes movies. We spend a lot of time in creative development, building tools, and being smarter about creating the best stories.
This tool come with six simple drawing tools , boards (add a board, draw, duplicate, copy, paste) and metadata for a board (duration, dialogue, action and note).
How can be used this tool?
You can start with your script or an empty board.
Then just draw each board and add all settings like: duration, dialogue, action and note.
You can export your work to Premiere, Final Cut, Avid, PDF, or Animated GIF.
You can edit your board with Photoshop.
You can improve this software with your source code using github.com - storyboarder.
You can download it from official website.

sâmbătă, 30 septembrie 2017
The EaselJS java script libraries.
The team development teel us:
A suite of modular libraries and tools which work together or independently to enable rich interactive content on open web technologies via HTML5.
To include the EaselJS libraries in your project by linking to the CreateJS CDN it is necessary to link them with script tag :
A suite of modular libraries and tools which work together or independently to enable rich interactive content on open web technologies via HTML5.
- EASELJS - working with the HTML5 Canvas;
- TWEENJS - for tweening and animating HTML5 and JavaScript properties;
- SOUNDJS - work with audio on the web;
- PRELOADJS - manage and co-ordinate the loading of assets and data;
To include the EaselJS libraries in your project by linking to the CreateJS CDN it is necessary to link them with script tag :
src="https://code.createjs.com/easeljs-0.8.2.min.js"
Posted by
Cătălin George Feștilă
 Labels:
2017,
2D,
3D,
createjs,
design,
graphics,
html5,
javascript,
web development
miercuri, 27 septembrie 2017
Blender 3D - Open Shading Language tutorial.
Today, I will show you how to use the Open Shading Language with Blender 3D version 2.79.
Use the Scripting area from Screen layout and Cycles for rendering.
Select from Render tab and check the option:Open Shading Language.
Add your object to test this tool.
For example you can use the default Cube.
Add a material to this object.
The Scripting area from Screen layout come with editor text.
Use Templates - > Open Shading Language -> Empty Shader and add this OSL script:
This will come with a open dialog icon to add your OSL script.
Link result to Color from your material Diffuse BSDF. All this steps I tell you is on the next image: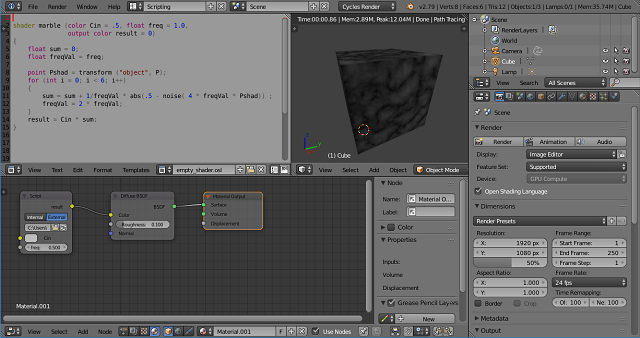
Use the Scripting area from Screen layout and Cycles for rendering.
Select from Render tab and check the option:Open Shading Language.
Add your object to test this tool.
For example you can use the default Cube.
Add a material to this object.
The Scripting area from Screen layout come with editor text.
Use Templates - > Open Shading Language -> Empty Shader and add this OSL script:
shader marble (color Col = .5, float freq = 1.0,
           output color result = 0)
{
float sum = 0;
float freq_value = freq;

point pixel_shader = transform ("object", P);
for (int i = 0; i < 6; i++)
{
    sum = sum + 1/freq_value * abs(.5 - noise( 4 * freq_value * pixel_shader)) ;
    freq_value = 2 * freq_value;
}
result = Col * sum;
} This will come with a open dialog icon to add your OSL script.
Link result to Color from your material Diffuse BSDF. All this steps I tell you is on the next image:

Posted by
Cătălin George Feștilă
 Labels:
2017,
3D,
blender,
Blender 3D,
Open Shading Language,
open source,
OSL,
source code,
tutorial,
tutorials
marți, 26 septembrie 2017
The Gimp version 2.9.6 devel .
Today I tested the new devel tool Gimp version 2.9.6 from official website .
For me this graphic tool was stable.
I used version 2.9.6 for windows OS.
I don't test scripts just some of basic features.
Come with a funny install application and a good message for users.
The interface is same but with a dark theme.
The shortcuts keys are the same ( I don't see many changes).
For development option is this GIMP output.
When the application is start show me some errors, so I send all infos to development team.
I used this tool in the past and is great , free , easy to use and with many options.
If you know the interpreting language called Scheme the will love to scripting your Gimp tools.
Posted by
Cătălin George Feștilă
 Labels:
2017,
2017 news,
Gimp,
linux,
Linux 32,
Linux 64,
news,
tool,
windows 10
luni, 25 septembrie 2017
News: Blender 3D - version 2.79
The Blender 3D is an open source software with a great team.
They tell us about this new released version of Blender 3D:
These are the release notes for Blender 2.79, released September 12th, 2017.
You can also download this 3D software from here.
After you download it, you need to run the install executable for Windows.
If you use a Linux OS then you just run it with: ./blender.
You can the windows of this 3D software tool into the next image: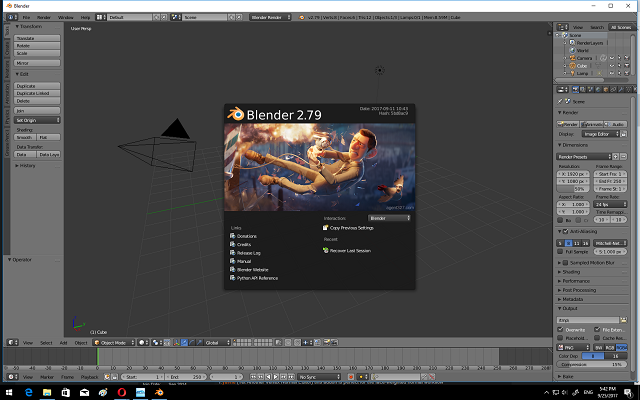
The next step is to set the Blender 3D from menu: File -> User Preferences ( or use keys Ctr - Alt - U ).
First step:
- set your CPU or graphic card - GPU into System tab;
- set your addons to see if works with this version;
- test all this with a simple example but using all renders: ( Blender, Cycles and Blender Game);
Some addons I used: ANT Landscape, animation-nodes, blam, blender-light-studio, mira-tools, uvsquares.
You can find more about this addons blenderartists website.
They tell us about this new released version of Blender 3D:
These are the release notes for Blender 2.79, released September 12th, 2017.
- Denoiser
- PBR Shader
- Shadow Catcher
- Filmic Color Management
- Faster AMD OpenCL
- over 700 bugs fixed
- so much more!
You can also download this 3D software from here.
After you download it, you need to run the install executable for Windows.
If you use a Linux OS then you just run it with: ./blender.
You can the windows of this 3D software tool into the next image:

The next step is to set the Blender 3D from menu: File -> User Preferences ( or use keys Ctr - Alt - U ).
First step:
- set your CPU or graphic card - GPU into System tab;
- set your addons to see if works with this version;
- test all this with a simple example but using all renders: ( Blender, Cycles and Blender Game);
Some addons I used: ANT Landscape, animation-nodes, blam, blender-light-studio, mira-tools, uvsquares.
You can find more about this addons blenderartists website.
Posted by
Cătălin George Feștilă
 Labels:
2017,
2017 news,
2D,
3D,
3d software,
Blender 3D,
design,
graphics,
linux,
Linux 32,
Linux 64,
news,
open source,
tool,
tutorial,
tutorials,
windows 10
joi, 21 septembrie 2017
News: Krita 3.3.0 – first release candidate.
This release come with some improvements and features:
- support for the Windows 8 event API;
- hardware-accelerated display functionality to optionally use Angle on Windows instead of native OpenGL;
- some visual glitches when using hi-dpi screens are fixed
- several new command line options;
- the performance improvements and selections are fixed;
- the system information dialog for bug reports is improved
marți, 19 septembrie 2017
Using processing.js to test ControlP5 .
The ControlP5 is a gui library written by Andreas Schlegel for the programming environment processing.
You can add this library open the processing IDE and under menu select Tools -> Add Tool ... . Use editbox to search the library named ControlP5 .
You can find many examples on official website.
Let's see how is look the Textarea GUI using processing IDE - official website example:
You can add this library open the processing IDE and under menu select Tools -> Add Tool ... . Use editbox to search the library named ControlP5 .
You can find many examples on official website.
Let's see how is look the Textarea GUI using processing IDE - official website example:
duminică, 17 septembrie 2017
Create 3D text with HTML 5 .
This is the result of this tutorial:

The example is simple and use two ways to draw text.
First use a function how make the text by using index variable to put on canvas same text.
The next use function strokeText to add to canvas the text.
The onload function is used to put on canvas all you need to see.
This is the source code for java script I used into head HTML5 tag :
window.onload = function(){
var canvas = document.getElementById("3dCanvas");
var canvasWidth = canvas.width;
var canvasHeight = canvas.height;
var ctx = canvas.getContext("2d");
ctx.font = "20pt Verdana";
ctx.fillStyle = "black";
ctx.textAlign = "center";
// first
drawTextInCanvas(ctx , "graphic-3d.blogspot.com", canvasWidth/2, canvasHeight/2, 4);
// the next
ctx.strokeText('... read this website !', 150, 150);
};
function drawTextInCanvas(ctx, mytext, wdth, hght, dpth){
var index;
for (index = 0; index < dpth; index++) {
ctx.fillText(mytext, wdth - index, hght - index);
}
// shadow casting in bottom layers
ctx.fillStyle = "#30F30F";
ctx.shadowColor = "black";
ctx.shadowBlur = 6;
ctx.shadowOffsetX = dpth+ 2;
ctx.shadowOffsetY = dpth+ 2;
ctx.fillText(mytext, wdth - index, hght - index);
}
Then add the canvas tag into body tag with this :
id="3dCanvas" width="400" height="200" style="border:1px solid black;"
Abonați-vă la:
Comentarii (Atom)


